 Save
Save My sister called me in a panic two days before the Fourth of July, asking if I could bring something patriotic to her backyard barbecue. I was standing in my kitchen staring at a mostly empty fridge when it hit me—those jiggly, colorful Jello cups I hadn't made since childhood. Within an hour, I had three jewel-toned layers sitting in clear cups, and when I pulled them from the fridge the next evening, even I was impressed. There's something about layered Jello that feels both effortless and showstopping, like you've discovered a secret.
I still laugh thinking about my nephew's face when he took his first spoonful—he genuinely thought I'd somehow trapped actual fruit inside the Jello. Watching kids and adults alike get excited over something this simple reminded me why these cups have stayed popular for decades. It's not just dessert; it's a little moment of joy in a cup.
Ingredients
- Red Jello (3 oz box, strawberry or cherry): The bottom layer sets the tone, literally and visually, so don't skip the chilling step or it'll meld into the white layer.
- Boiling water (1 cup for red layer): Hot water dissolves the gelatin completely, so use a kettle or heat it until steam rises.
- Cold water (1/2 cup for red layer): This tempers the mixture and helps it set properly without becoming rubbery.
- Unflavored gelatin (1 envelope): This is your secret weapon for the white layer, giving it structure without competing flavors.
- Cold water (1/2 cup for white layer bloom): Always let gelatin bloom in cold water first—it hydrates and prevents clumping when you add heat.
- Boiling water (1/2 cup for white layer): This dissolves the bloomed gelatin, so have it ready and hot.
- Sweetened condensed milk (1 cup): This creates that creamy, dreamy middle layer that makes the whole thing feel elegant.
- Blue Jello (3 oz box, blue raspberry): The top layer, so make sure you love this flavor since it'll be the lasting taste.
- Boiling water (1 cup for blue layer): Same principle as the red layer—complete dissolution means even color and texture.
- Cold water (1/2 cup for blue layer): Temperature control keeps the Jello from setting too fast or too slow.
- Whipped cream and fresh berries (optional garnish): These add texture and look stunning, turning a retro dessert into something Instagram-worthy.
Tired of Takeout? 🥡
Get 10 meals you can make faster than delivery arrives. Seriously.
One email. No spam. Unsubscribe anytime.
Instructions
- Gather Your Clear Cups:
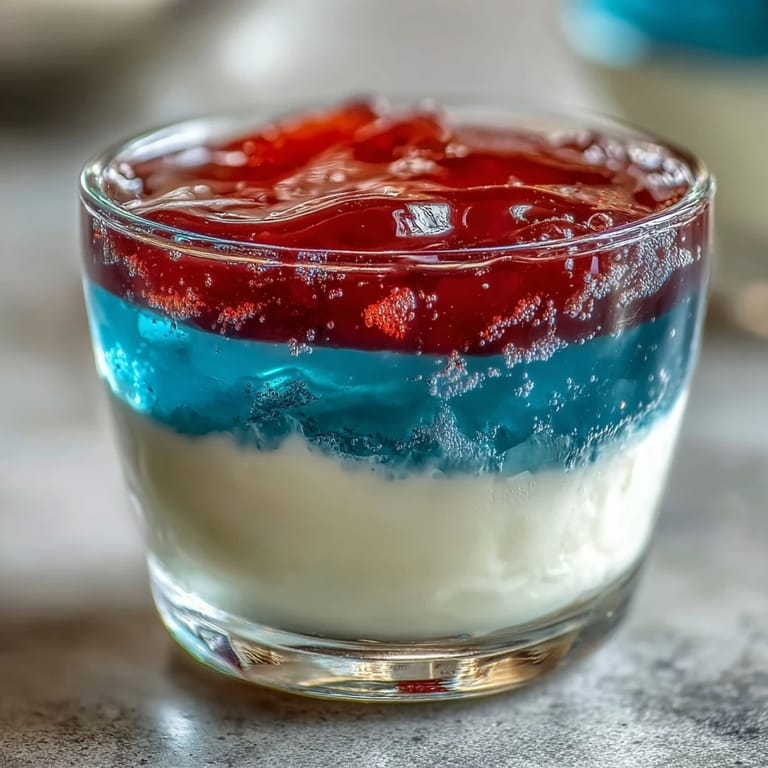
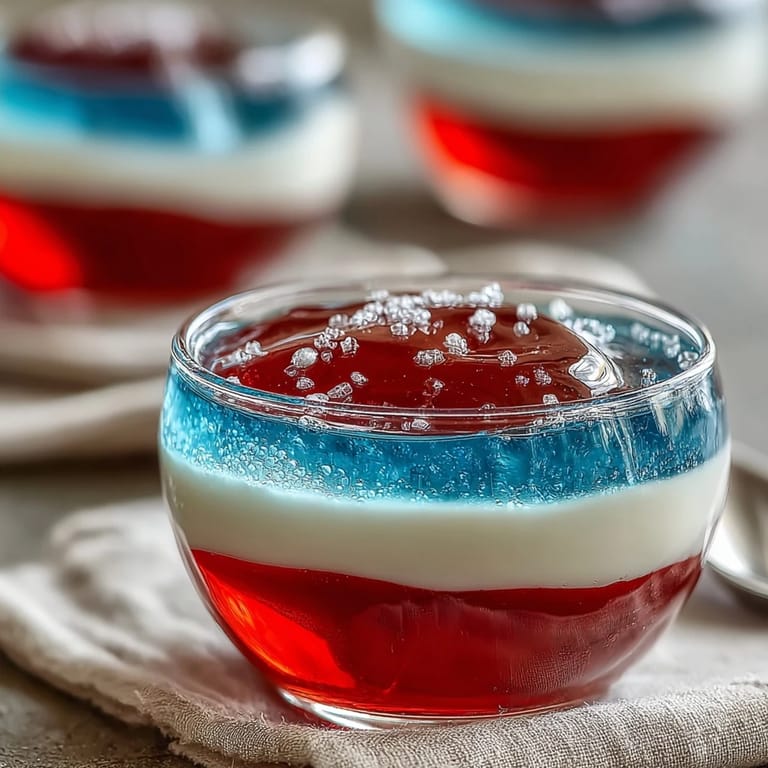
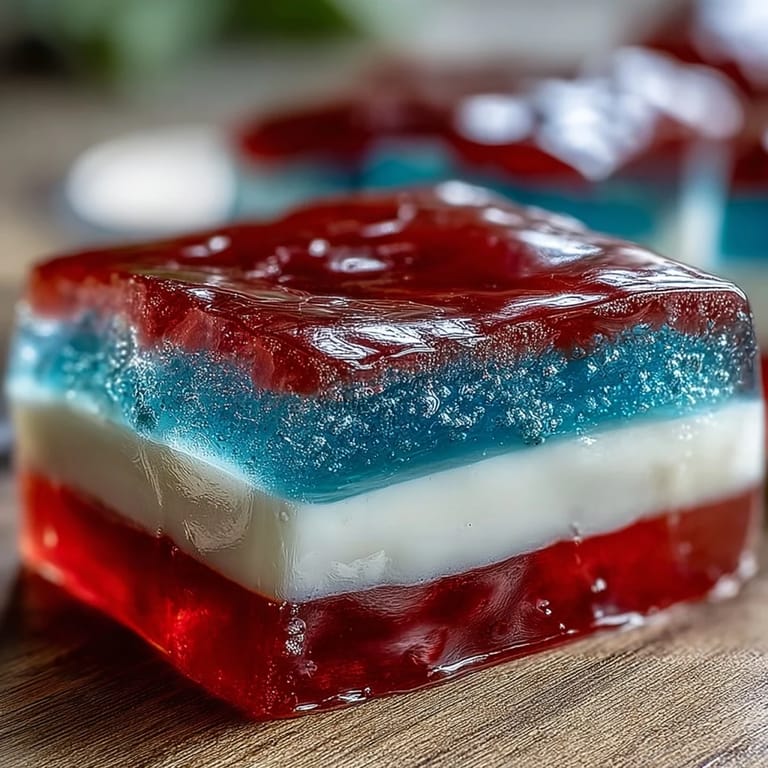
- Set out eight clear cups (6 to 8 ounces each) on a flat surface where they'll stay undisturbed for the next few hours. Clear cups matter because half the magic is watching the layers reveal themselves.
- Create the Red Foundation:
- Pour the red Jello powder into a bowl and add one cup of boiling water, stirring constantly until the powder dissolves completely—about one minute of steady stirring. Pour in half a cup of cold water and give it another quick stir.
- Chill the Red Layer at an Angle:
- Divide the red mixture evenly among the cups, adding about two tablespoons to each. Here's the trick nobody talks about: nestle the cups into a muffin tin at a slight angle so the first layer sets thick and even, then refrigerate for 45 to 60 minutes until it feels set when you gently touch the surface.
- Bloom and Build the White Layer:
- While the red sets, sprinkle the unflavored gelatin over half a cup of cold water in a fresh bowl and let it sit for exactly five minutes—this bloom step prevents lumps. Add half a cup of boiling water and stir until the gelatin dissolves completely, then pour in the sweetened condensed milk and stir until smooth and pale.
- Cool the White Mixture Properly:
- Let this white mixture cool to room temperature before pouring, or it'll melt the red layer below and ruin your stripes. I usually let it sit for 10 to 15 minutes while checking on the red layer.
- Layer the White Middle:
- Once the red layer is firmly set, gently pour the white mixture over it, dividing about two tablespoons among the cups. Set the cups upright now and return them to the refrigerator for another 45 to 60 minutes until the white layer is completely firm.
- Prepare the Blue Finale:
- Dissolve the blue Jello powder in one cup of boiling water, stirring for about a minute, then stir in half a cup of cold water. Let it cool to room temperature—you want it cool but still liquid, not starting to gel.
- Add the Blue Top Layer:
- Pour the cooled blue mixture gently over the white layer, dividing it evenly among the cups with about two tablespoons per cup. Refrigerate the finished cups upright for at least two hours, or overnight for maximum set and clarity.
- Final Touches Before Serving:
- Just before serving, top each cup with a dollop of whipped cream and a scatter of fresh berries if you're feeling fancy. They'll look like little patriotic jewels.
 Save
Save There's a moment right before you serve these when you pull them from the fridge and the light catches those three perfect layers—that's when you realize you've made something people will actually remember. It's such a small thing, but it matters.
The Angle Hack That Actually Works
I discovered the muffin tin trick by accident when I was out of a cooling rack and grabbed what was on the shelf. Tilting the cups creates a perfectly sloped surface so the red layer sets thick and even without sliding around. It looks silly in the fridge, but the results are worth feeling a little foolish.
Flavor Swaps That Keep It Exciting
You're absolutely not locked into strawberry, white, and blue. I've made them with lime and blackberry, and once I went wild with orange and lemon for a sunset version. The condensed milk layer stays creamy white no matter what, so it works as a neutral buffer between any two flavors you love.
Timing and Storage Secrets
These cups are forgiving in the best way—you can make them the day before, and they actually taste better after sitting overnight as the layers fuse slightly. Keep them covered loosely in the fridge so they don't absorb other food smells, and eat them within three days.
- Make them up to two days ahead and store them covered in the coldest part of your fridge, away from anything pungent like onions or fish.
- If you're serving at an outdoor party, keep them in a cooler with ice packs, and pull them out just before guests arrive for the showiest moment.
- The whipped cream and berries go on at the very last minute so everything stays crisp and perfect.
 Save
Save These jiggly, jewel-toned cups have a way of turning a simple barbecue into something people talk about. Make them once and they'll become your secret dessert superpower.